
Embedded systems, Linux, mobile devices, tech gadgets and many other stuff
Iperf for ARM: cross-compile
What is Iperf?
"Iperf was developed by NLANR/DAST as a modern alternative for measuring maximum TCP and UDP bandwidth performance. Iperf allows the tuning of various parameters and UDP characteristics. Iperf reports bandwidth, delay jitter, datagram loss." [1]
Download Iperf 2.x
Iperf 2.x is hosted in source forge server. The latest stable Iperf 2.x version can be downloaded from here
Compile Iperf for your ARM device
In this example I have used the Iperf version 2.0.5 and the Sourcery G++ Lite 2010q1-188 toolchain [2]
1. Setting up compiler variables
$ export CROSS_COMPILE=arm-none-linux-gnueabi-
$ export CC=${CROSS_COMPILE}gcc
$ export CPP=${CROSS_COMPILE}cpp
$ export CXX=${CROSS_COMPILE}g++
$ export LD=${CROSS_COMPILE}ld
$ export AR=${CROSS_COMPILE}ar
2. Start Iperf configuration
$ configure --build=arm-none-linux-gnueabi \
--host=armv9-none-linux-gnueabi
3. Compile Iperf tool statically
$ make CFLAGS=-static CXXFLAGS=-static
4. The Iperf executable binary is located at src folder of the root compilation path. The following is an example of the output when the ARM device is acting as a server (This tutorial doesn't cover Iperf measurement process):
bash-4.0# ./iperf -s -w 2M -i 1
-----------------------------------------------------
Server listening on TCP port 5001
TCP window size: 256 KByte (WARNING: requested 2.00 MByte)
-----------------------------------------------------
[ 4] local 128.247.75.107 port 5001 connected with 128.247.75.64 port 48647
[ ID] Interval Transfer Bandwidth
[ 4] 0.0- 1.0 sec 11.0 MBytes 92.0 Mbits/sec
[ 4] 1.0- 2.0 sec 11.2 MBytes 94.0 Mbits/sec
[ 4] 2.0- 3.0 sec 11.2 MBytes 94.1 Mbits/sec
[ 4] 3.0- 4.0 sec 11.2 MBytes 94.1 Mbits/sec
[ 4] 4.0- 5.0 sec 11.2 MBytes 93.9 Mbits/sec
[ 4] 5.0- 6.0 sec 11.2 MBytes 94.2 Mbits/sec
[ 4] 6.0- 7.0 sec 8.42 MBytes 70.7 Mbits/sec
[ 4] 7.0- 8.0 sec 11.2 MBytes 93.6 Mbits/sec
[ 4] 8.0- 9.0 sec 11.2 MBytes 94.1 Mbits/sec
[ 4] 9.0-10.0 sec 11.2 MBytes 94.0 Mbits/sec
[ 4] 0.0-10.0 sec 109 MBytes 91.5 Mbits/sec
Troubleshooting
If a undefined reference to 'rpl_malloc' problem occurs during the compilation process you can do the following as mentioned in this forum thread:
$ export ac_cv_func_malloc_0_nonnull=yes
Note: Preferable to start a clean build after setting up this variable to avoid further errors.
[1] http://sourceforge.net/projects/iperf/
[2] https://sourcery.mentor.com/sgpp/lite/arm/portal/release1294Valgrind for ARM
This is how I prepared Valgrind for my ARM device:
1. Download valgrind 3.6.1 and untar the package
2. Download a version of the Code Sourcery toolchain
* I used the Sourcery G++ Lite 2010q1-202 for ARM GNU/Linux
3. Add the Code Sourcery toolchain to the PATH, you'll need it later
$ PATH=<somewhere>/arm-2010q1/bin:$PATH
4. How to cross compile Valgrind:
$ export CROSS_COMPILE=arm-none-linux-gnueabi-
$ export CC=${CROSS_COMPILE}gcc
$ export CPP=${CROSS_COMPILE}cpp
$ export CXX=${CROSS_COMPILE}g++
$ export LD=${CROSS_COMPILE}ld
$ export AR=${CROSS_COMPILE}ar
$
$ ./configure --target=arm-none-linux-gnueabi \
--host=armv7-none-linux-gnueabi \
--prefix=<installation-path> \
CFLAGS=-static
$ make
$ make install
5. Create a directory in your ARM device with the name of the installation path (see above for prefix)
# mkdir -p <installation-path>
6. Copy all the content from the installation in your host machine to the installation patch in your ARM device
7. Add Valgrind binary location to the PATH in your device:
# PATH=<installation-path>/bin:$PATH
8. Now, you are ready to play with Valgrind:
# cat /proc/cpuinfo
Processor: ARMv7 Processor rev 10 (v7l)
# valgrind
valgrind: no program specified
valgrind: Use --help for more information.
# valgrind --version
valgrind-3.6.1
9. Find memory leaks: Quick Start Guide

Git Bisect: divide and conquer search algorithm
Have you heard about git-bisect? Well, if you haven’t, let me tell you that this command is a powerful GIT debug tool to find a change which has introduced a bug somewhere in the history of a GIT tree. The power of this command resides in the fact that it uses a binary search algorithm to locate the position of the element in a delimited change set. In my opinion, “git bisect” is one of the best feature that the GIT version control offers.


In the following examples we can appreciate a 6-way merge (A) and an octopus merge (B):

How many git-bisect iterations before knowing the “bad” revision?
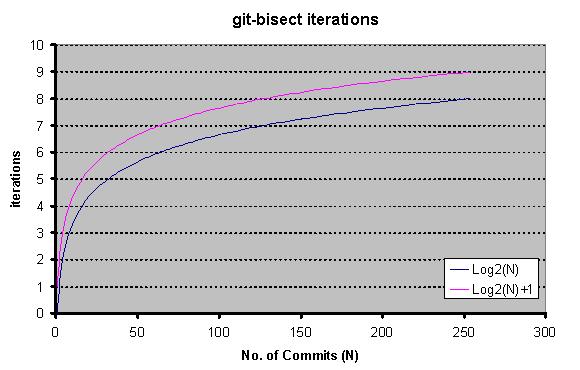
As we previously mentioned, git-bisect is a binary search algorithm applied to an N list of elements (commits). So, after the first iteration there will be at most N/2 elements to probe, in a second iteration there will at most N/4 elements remaining, then N/8 and so on. The total of iteration is given by the following equation:

In the worst scenario, git-bisect will continue iterating until there are no more elements to probe, this will take at most floor(Log2(N)+1) = Log2(N)+1 , just one more iteration than expected.
The following graph shows the behavior of the logarithmic algorithm to find the number of iterations according to the numbers of elements (commits) to be git-bisected. As an example, the total iterations in 128 and 254 commits will be the same according to the floor function normalization

Let’s remember that git-bisect will perform the bisection in a total of commit IDs calculated as follows:

How to use “git bisect”?
To see the git-bisect manual page click here.
Git-bisect will drive a binary search to find the version where the bug was introduced.
To find more help about this tool you can type the following in command line:
To find more help about this tool you can type the following in command line:
$ git bisect helpTo use this tool you need to identify two points of reference, a good revision and a bad revision, then you will provide the commits IDs for each of the “rev” values listed below:
git bisect start [<bad> [<good>...]] [--] [<paths>...]
git bisect bad [<rev>]
git bisect good [<rev>...]
<Run your tests and evaluate. Repeat these steps to narrow down which of the commits was the problem>
Other useful subcommands are the following:
$ git bisect skip [(<rev>|<range>)...]
$git bisect reset [<commit>]
$ git bisect visualize
$ git bisect replay <logfile>
$ git bisect log
If you really want to automate this process you may want to explore more about the following subcommand:
$ git bisect run <cmd>...
How “git bisect” works?
Let’s considered a change set as an array R of N elements with an attribute Commit. Elements 1 to N ordered on the position of Commit, such that:
A and B will be our boundaries where A=<good commit>=0 and B=<bad commit>=N+1
The following flowchart represents the process follow by git-bisect:
The following flowchart represents the process follow by git-bisect:

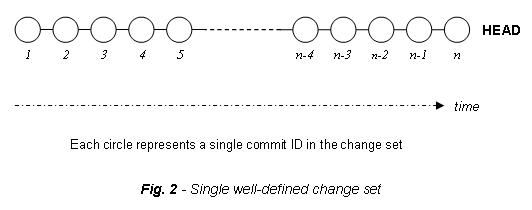
When can I use git-bisect?
Git-bisect can be used in any GIT tree, but you need to consider the complexity of the same one in order to select the best debug strategy to maximize the benefits of this command. A single well-defined change is the best scenario where git-bisect can show all its potential.
But when the change set to be git-bisected is the result of the interaction of two or more branches, the debugging process will be less straightforward than debugging a single branch (well-defined change set), and this gets worse when you have a N-way merge like an octopus-merge, causing git-bisect to be less efficient. Don’t forget that git bisect at least will pinpoint to the merge that is causing the problem.

In the following examples we can appreciate a 6-way merge (A) and an octopus merge (B):

How many git-bisect iterations before knowing the “bad” revision?
As we previously mentioned, git-bisect is a binary search algorithm applied to an N list of elements (commits). So, after the first iteration there will be at most N/2 elements to probe, in a second iteration there will at most N/4 elements remaining, then N/8 and so on. The total of iteration is given by the following equation:
In the worst scenario, git-bisect will continue iterating until there are no more elements to probe, this will take at most floor(Log2(N)+1) = Log2(N)+1 , just one more iteration than expected.
The following graph shows the behavior of the logarithmic algorithm to find the number of iterations according to the numbers of elements (commits) to be git-bisected. As an example, the total iterations in 128 and 254 commits will be the same according to the floor function normalization
Let’s remember that git-bisect will perform the bisection in a total of commit IDs calculated as follows:
How to learn git-bisect: practicing!!
The theory behind git-bisect is really interesting, but the real value is to know how to use it and that will come only by practicing. This tool has proved to be very useful to find bugs, but the power of this command should not be limited only for that purpose. There are still many aspects that can be improved in this algorithm like the bisection of an octopus merge or any N-way merge for N > 3 of course, but these aspects are nothing compared with the fact that it has helped to minimize the time of debugging of thousands of projects.AVD fail to start with Android SDK tools Rev 12
I was trying to launch an Android application using Eclipse 3.6.2 and Android SDK tools REV 12, when I noticed that the Android Virtual Device failed to start with the following error message:

The issue is caused by blank spaces in the Android SDK location exported in Eclipse under Window -> Preferences -> Android
A solution for Windows users is to replace the Android SDK location name for its short filename version (8.3 notation)
How to get the SFN for the Android SDK location in Windows?

For our case we need to change the "Program Files (x86)" by "PROGRA~2" in Window -> Preferences -> Android:

Apply the changes and execute the application, the AVD will be launched succesfully.
invalid command-line parameter: File
Hint: use '@foo' to launch a virtual device named 'foo'.
please use -help for more information

The issue is caused by blank spaces in the Android SDK location exported in Eclipse under Window -> Preferences -> Android
A solution for Windows users is to replace the Android SDK location name for its short filename version (8.3 notation)
How to get the SFN for the Android SDK location in Windows?
- Execute the Command Prompt (CMD)
- Type "DIR /X" to list the directories with their SFN

For our case we need to change the "Program Files (x86)" by "PROGRA~2" in Window -> Preferences -> Android:

Apply the changes and execute the application, the AVD will be launched succesfully.
BASH file test operators
Here is a summary of BASH file test operators:
The general form of a file test operation is -operator "filename"
The general form of a file test operation is -operator "filename"
Operator Returns true if
-e File exist
-f It is a regular file
-d File is not zero size
-s File has a size greater than zero
-b File is a block device
-c File is a character device
-p File is a pipe (FIFO)
-h File is a symbolic link
-L File is a symbolic link
-S File is a socket
-t File (descriptor) is associated with a terminal device
-r File has read permissions (for current user)
-w File has write permissions (for current user)
-x File has execute permissions (for current user)
-g set-group-id (sgid) flag is set on file or directory
-u set-user-id (suid) flag is set on file
-k sticky bit is set
-O File is owned by the effective user id
-G File is owned by the effective group id
-N File modified since it was last read
f1 -nt f2 File f1 is newer than file f2 f1 -ot f2 File f1 is older than file f2
f1 -ef f2 Files f1 and f2 are hard links to the same file
! "NOT" - returns true if condition is absent
Execute man bash for more information
Subscribe to:
Posts (Atom)